Revised 5.3 part 2 – Hand Stitched Samples
Overview
Having undertaken my analysis of my initial 5.3 and my decision to focus on one or two approaches rather than many I decided to focus further on the shapes from the bourganvillea flower and leaves. I was drawn to my work in Part 2 Assign 2 Part 2 Project2 Ex 2.3 of seed pods using cutwork/insertion type stitching. The reason I was drawn to this approach was that my sample in Part 2 depicted fragility and semi transparency. The bougainvillea petals are fragile and easily torn so this approach appealed to me for further sampling. It also influenced by my Archive Item in Project 1 The Christening Gown Project 1 Exercise 1.2 Substance 3. The Gown has a net overlay with embroidered/lace.
I reviewed my colour palette samples Revised Colour Palette – Colour Collage Part 5.2 and decided to continue with a similar colour palette to sample 5.2.3 the apricot/orangey/creams and trying a little blue/green. These colours were inspired by the bougainvillea bushes in my Tropical Tourist living collage and the colours of the fading/dyeing hibiscus flowers used as inspiration in 5.2.9Part 5 Project 2, 2.4 Develop yarn and linear concepts.
Hand Stitched Samples
What I did.
I decided for my revised 5.3 to work a series of samples using natural/apricots and some green blue colour fabric and orange/apricot and cream threads. The fabrics and papers used in the sample were mainly semi transparent or translucent. I have in mind that these may be used in work influenced by my experiments in the revised 5.3 printed samples. I thought about how I could play further with my lacy type insertion stitching using the bougainvillea petal shape as the cutout. I did not consult a Stitch Method Book rather I just depicted my thoughts using free stitching.
Revised 5.3 Hand Stitched Experimental Samples
I did nine samples each using different materials. The aim being to see the potential of the various materials with the stitch.

Revised 5.3. sample 16 (handstitch) – I used a medium weight linen for this first sample and cut out the shape of the petal. I used two different weight threads to do an overcast type stitch on the edge of each cutout. The thick thread stood out dramatically and the thinner thread melded more with the linen. For the weight of the linen I thought the thick thread was more successful and sat better on the linen.
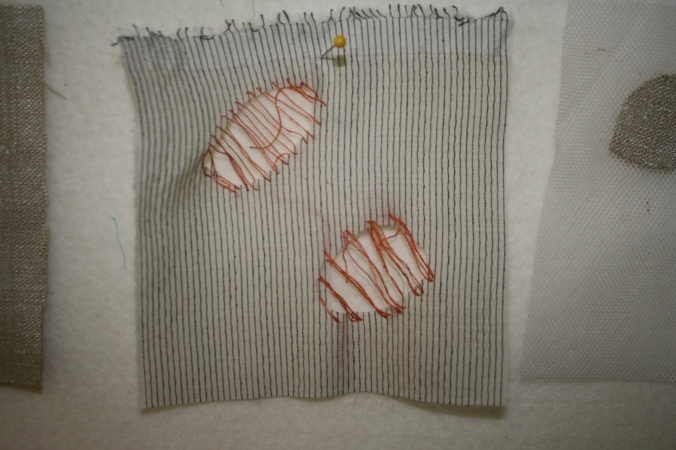
Revised 5.3 sample17(hand stitch) for this sample I used a thin fabric I am not sure if it is a cotton voile and cut out the petals. I used a fine cotton orange thread on the top cutout I used single thread and on the bottom double thread. The single thread worked far better and sat with the weight of the fabric well.

Revised 5.3 sample18(applique)
Rather than waste the removed petal shape I decided to appliqué thus creating a type of negative and positive effect to see if I wanted to use both or one of these approaches in future work. In the above sample 18 I used netting and in the top petal I hand stitched the linen petal and in the bottom I used the machine to stitch the petal. The hand stitch one worked better and sat on the netting better. Even though the linen was a medium weight fabric it sat on the netting well. The effect is like petals floating in the breeze.

Revised 5.3. sample 19 – For this sample I tried silk organza and appliquéd the two petals created from the cutout of Sample 17. I hand stitched both petals and the effect to me was once again like petals floating with the sheerness of the organza making this effect more marked than Sample 18.
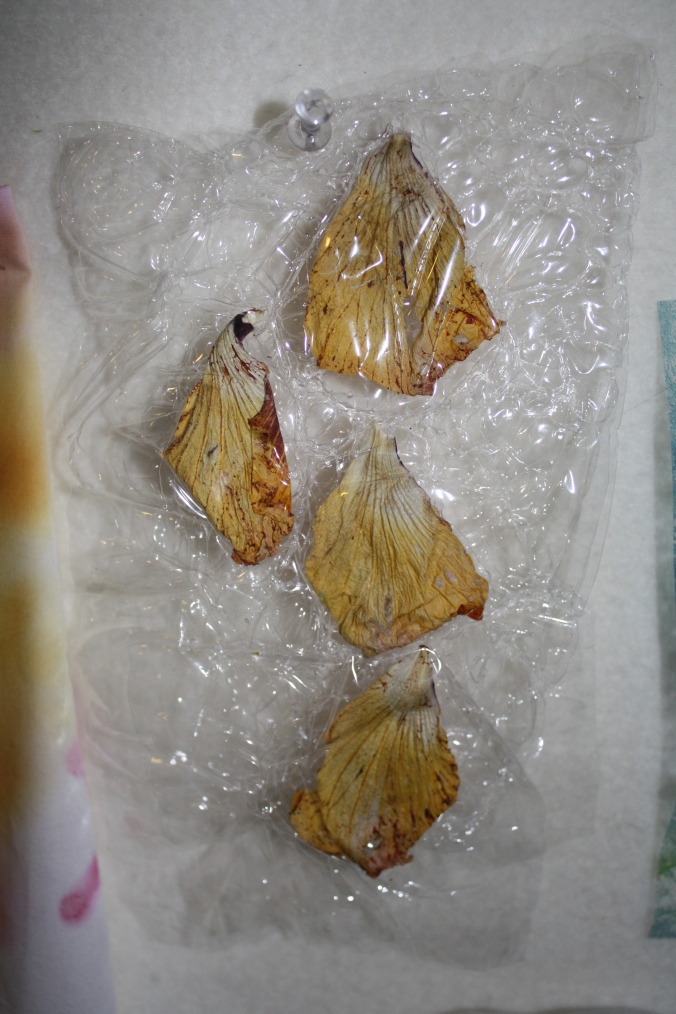
Revised 5.3 Sample 20 – I used the cellophane melted to capture the real hibiscus petals. Partly I did this because I loved the colours of the dead petals – the variations in colour and the lines of the petals and wanted to capture this effect for further consideration.

Revised 5.3. Sample 21- I painted a piece of thick tracing paper with red watercolour and cut out the petal shapes. I stitched using a single pearl 8 thread in orange and left one unstitched for contrast. The paper worked well the effect was interesting as the paper buckled and this created areas of darker and lighter colour and texture too. The stitching was ‘spidery’ and light.
Revised 5.3 – Sample 22 – For this experimental sample I coloured a teabag using procion dye. I folded the teabag to create interesting lines in the dyeing process. Given the amount of activity with the coloured surface of the teabag I chose to do free style hand stitching just down the centre of the cutout petal shape. I really think though that the dyeing effects on the teabag take away from the petal and the stitching and are busy for the type of effect I was trying to create with more emphasis on the petal.
Revised 5.3 – sample 23 This time I experimented with light lutradur which I coloured blue green with acrylic paint. I love the web type surface of the light lutradur. I chose to stitch with a orange brown pearl 12 thread and for the second petal I left blank (this may be useful to have a blank one for further experimentation). I think the thread is too thick the stitch design I like but a lighter finer thread would work better to create the ethereal fragile type quality I was seeking in the experiment.

Revised 5.3 sample 24 – For this piece I coloured using acrylic paint a piece of medium weight lutradur and also for more interest used copper textile ink to print some circular type shapes using a toilet roll. I half cut the circles to see if this effect was interesting or had potential for further use. I was not so keen so decided to add some stitching as well to create more interest. This time I chose a fine thread doubled. I do not like the choice of thread it does not work in colour or weight. A copper colour thread may have worked better and a better stitch design.
Analysis
I think I like the experiments with the cutout petal work as indicated under each Sample some work better than others. Taking the concept forward I see potential to use this type of approach in larger work with a printed fabric underneath. It goes back to the Christening Robe I used in my Archive Collection in Project 1Project 1 Exercise 1.2 Substance 3 which has a netting overlay with lace type embroidered work.
